
Being an owner of a dedicated server means having root access to it and being responsible for installing necessary software. If you’re not a tech-savvy person, that can be pretty challenging, but Inxyhost team prepared a few guides on how to install essential libraries and components on your dedicated server. These step-by-step instructions will ease the task considerably.
Installation of PHP
PHP (the name comes from words ‘Hypertext Preprocessor’) is a common open-source general-purpose scripting language created for web development and embedding into HTML. Instead of featuring lots of commands to output HTML, PHP pages have HTML with embedded code that executes some commands. PHP code is enclosed in special start and end processing instructions, with the help of which you can activate and deactivate PHP mode. Although PHP is perfect for newcomers, it has features for professional programmers.
How to install PHP on a Windows dedicated server?
1) Get latest version of PHP from www.php.net
2) Unzip contents to c:\php
3) Copy all files from c:\phpdlls to c:\windows\system32
4) Copy all files from c:\phpsapi to c:\windows\system32
5) Copy c:\php\php.ini to c:\windows\php.ini
6) Open IIS, and add a "Web Service Extension"
7) Call the extension "PHP"
8) Set the path as c:\windows\system32\php5\isapi.dll.
9) Set the status to "allow"
10) Right click the "Web Sites" folder, and choose properties.
11) On the "Home Directory" tab, select "Configuration"
12) Click "Add", then browse to c:\windows\system32\php5\isapi.dll, set the extension as .php, and deselect "Verify that the file exists".
13) Click Okay
14) Apply the setting to all sites.
15) Restart IIS.
How to install PHP on a Linux dedicated server?
Prior to installation, make sure that all packages are up-to-date. That can be done with ‘apt-get update’ command.
To install PHP on Apache 2, use the following command:
# apt-get install php5-common libapache2-mod-php5 php5-cli
APT will automatically install PHP 5 module for Apache 2 and activate it. Apache should be restarted to activate the changes. For example:
# /etc/init.d/apache2 stop
# /etc/init.d/apache2 start
Initially, PHP is installed with basic features. If you need additional modules, such as MySQL, cURL, GD and so on, it can be done with the help of ‘apt-get’ command:
# apt-cache search php5
# aptitude search php5
# aptitude search php5 |grep -i mysql
You will see the list of many different packages including specific ones, for example, php5-cgi, php5-cli and php5-dev. Define which ones you need and install them with apt-get or aptitude.
# apt-get install php5-mysql php5-curl
APT will automatically add lines to corresponding php.ini, /etc/php5/apache2/php.ini, /etc/php5/conf.d/pdo.ini, etc. Depending on the extension, there will appear notes like extension=foo.so. To activate all these changes, you need to restart your web-server.
Installation of NGINX
NGINX is open source software that combines a lot of useful functions, including load balancing, caching, proxying, media streaming, etc. Together with HTTP server functions, if also has features to work as a proxy server for email, a reverse proxy and load balancer for TCP, HTTP and UDP servers. This server works with most protocols, including HTTP, HTTPS, IMAP, POP3 and SMTP. NGINX is created for Linux operating systems, for instance, CentOS, and is HTTP, HTTPS, IMAP, POP3 and SMTP with everything needed for installation (public PGP key and configuration file). To perform installation, you need first to install nginx software repository, and then the software from this repository.
- Connect to your server via SSH.
- Get the root access.
- Enter the directory where you plan to install the repository. For instance:
# cd /tmp
- Download the suitable nginx binary package. For instance, this wget command downloads the latest version of package for CentOS:
# wget http://nginx.org/packages/centos/7/noarch/RPMS/nginx-release-centos-7-0.el7.ngx.noarch.rpm
- Install the nginx yum configuration file for this package using the rpm command below:
# rpm -ivh nginx-release-centos-7-0.el7.ngx.noarch.rpm
- This yum command will install nginx from the yum configuration file automatically answering "yes" to all questions:
# yum install nginx
- If installation was successful, the yum command will produce output similar to the following:
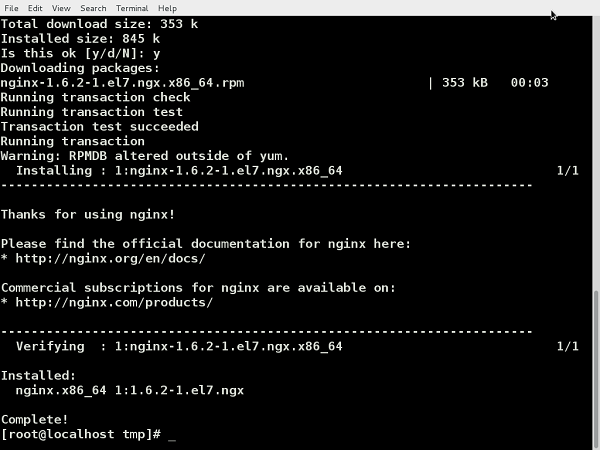
8. Enter these commands to enable and start nginx:
# chkconfig nginx on
# service nginx start
NOTE: If you have another service with port 80, for example, Apache, you need to stop this service before starting nginx. You can alter the port for nginx by changing /etc/nginx/conf.d/default.conf file.
- Enter the following URL into your browser:
http://127.0.0.1:80
Here you should see the page saying nginx is running correctly.
Installation of JavaScript
JavaScript is a professional dynamic programming language, one of the main technologies for Internet content production. It’s needed to make web pages interactive and create online programs, video games, etc. It’s used on majority of websites and supported by all modern browsers thanks to plug-ins.
Installation of JavaScript with apt-get
- Choose the Java package to install.
- Open a terminal window and enter as a root user. Execute the following command to include the available OpenJDK packages that may install Java:
# apt-cache search openjdk
In this case, select openjdk-7-jdk, the OpenJDK 7 Development Kit.
Install OpenJDK
- Use this command to update the list of available packages from your remote repositories:
# apt-get update
- Install the software package you have chosen:
# apt-get install openjdk-7-jdk
When you need to authorize the required storage space for the installation, press ‘y’.
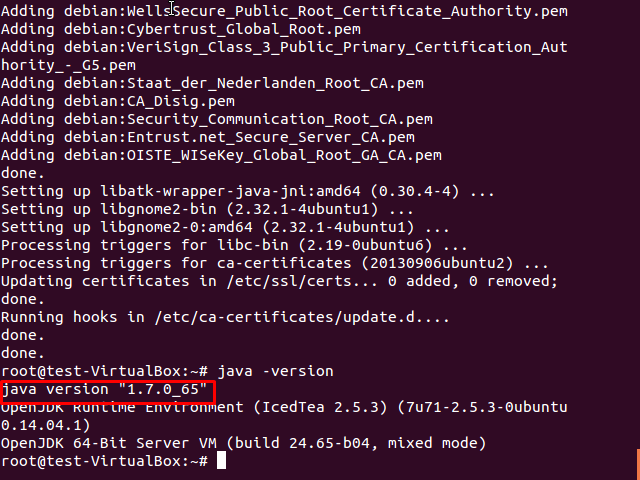
- Check that Java has been installed. This command will show which version of JavaScript has been installed:
# java -version
For example:
Installation of Java on Linux-based servers
Let’s check how JavaScript is installed on Ubuntu dedicated servers. Before starting, you need to find out whether you have a 32-bit or 64-bit version of Ubuntu. To determine that, you need to run the file command for the init boot startup file:
file /sbin/init
The results will look like the following:
/sbin/init: ELF 64-bit LSB shared object, x86-64, version 1 (SYSV), dynamically linked (uses shared libs), for GNU/Linux 2.6.24, BuildID[sha1]=0x7aa29ded613e503fb09fb75d94026f3256f01e7a
- Visit http://www.java.com/en/download/manual.jsp and download the Linux version for your installation (Linux for the 32-bit release or Linux x64 for the 64-bit release). Oracle site will provide you with detailed instructions. You'll download a file named somewhat like jre-8u25-linux-i586.tar.gz (32-bit) or jre-8u25-linux-x64.gz (64-bit). This name can look totally different.
- Now, run the rest of the commands as a root user.
- When files are downloaded, create space to store the unpacked content you’ve just downloaded. It can be a completely different place, if you want to install Java in a different location. For example:
mkdir /usr/local/java
- Now unpack what downloaded files into this directory:
cd /usr/local/java
tar -xvzf /tmp/jre-8u25-linux-x64.gz
- When unpacking is finished, you need to add "Java" to your path so it can be found when you need to run JS. Add the following to /etc/profile, and don’t forget to use the directory that was generated when you unpacked the downloaded files. There will be a sub-directory for the version installed. Use that as your JAVA_HOME. Use a preferable text editor to edit the /etc/profile file.
vi /etc/profile
Add the following to the bottom of file:
JAVA_HOME=/usr/local/java/jre1.8.0_25
PATH=$PATH:$JAVA_HOME/bin
export JAVA_HOME
export PATH
The next time you login, you can check whether you set up your environment correctly. If everything’s right, the following command will tell you what version is running. It should be the same that you’ve just installed.
java -version
Output should be like:
java version "1.8.0_25" Java(TM) SE Runtime Environment (build 1.8.0_25-b17) Java HotSpot(TM) 64-Bit Server VM (build 25.25-b02, mixed mode)
Installation of MySQL Database
You can create a MySQL database on your Dedicated Server two ways: manually, or with MySQL wizard. Let’s try the first option.
- Login to cPanel customer interface as a root user.
- Under the Databases section, find the MySQL Databases link and click it.
- Under the Create New Database section type the name for your new MySQL database. Then push Create Database button.
Congratulations! Your new MySQL database is ready.
Install MySQL Database with MySQL Database Wizard
- Login to cPanel customer interface as a root user.
- In the Databases section, click on the MySQL Databases link.
- Go to Create New Database section and type the name for your new database, and then click Create Database button.
- Add users to your new database: enter a username and a password and click on the Create New User button.
- Set access permissions for the new user and click on the Next Step button.
Now you know how to install basic components and libraries on your dedicated server: these are crucial for your work as they help to execute a lot of tasks. If you still have any questions and problems during installation, INXYHOST support team is always ready to help you!


comments